Table of Contents
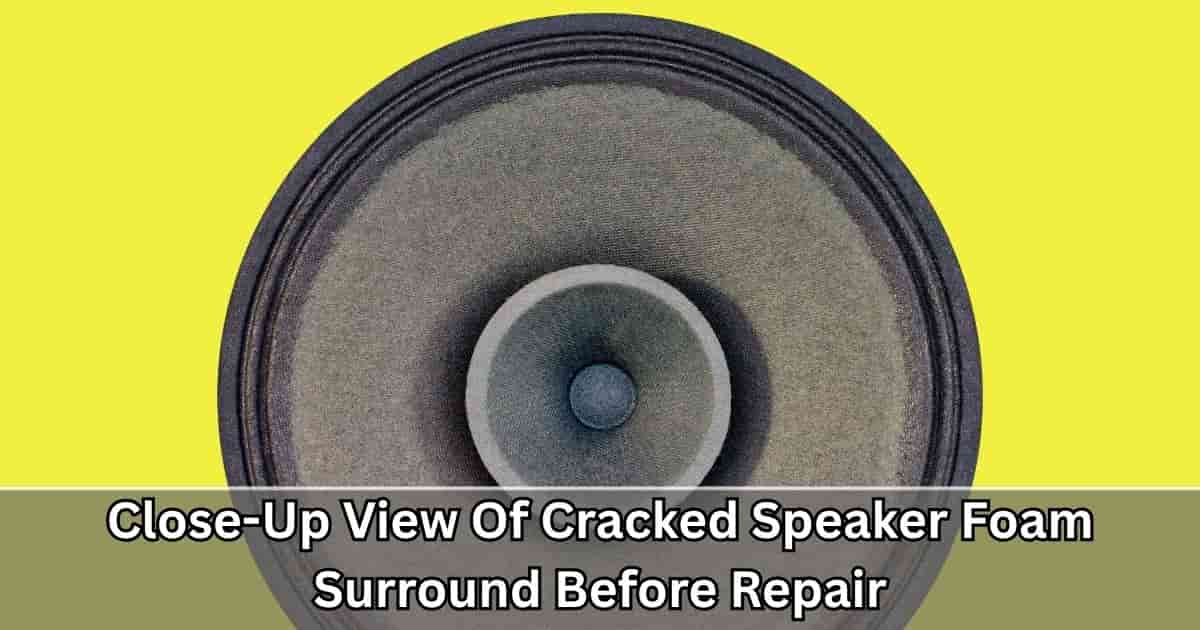
Essential parts assisting your speaker cones move back and forth smoothly while preserving alignment are speaker foam surrounds. Age, humidity, UV exposure, or just general wear and tear can eventually cause these foam surrounds to break down. The outcome: Distorted sound, humming, or even a speaker totally useless.
The good news is that with a few tools, patience, and the appropriate technique, you can fix the foam surrounds at home rather than having to replace the whole speaker. We will show you precisely how to repair speaker foam surround damage and get your sound system back to its former brilliance in this thorough guide.
What is Speaker foam surround?
The flexible ring connecting the edge of the speaker cone to the speaker basket (frame), the foam surround enables the cone to go in and out, hence creating sound. It also helps preserve the cone’s alignment, therefore avoiding contact with other internal components like the voice coil.
Common Symptoms of Foam Surround Damage:
- Crackling or buzzing noise
- Distorted or muffled sound
- Loss of bass or volume
- Visible cracks or tears around the cone
- Floppy or loose cone movement
What Causes Foam Surround to Deteriorate?
Several factors can lead to speaker foam surround damage:
| Cause | Description |
| Age | Most foam surrounds degrade after 10–15 years due to material fatigue. |
| Humidity & Moisture | High moisture can weaken the foam and cause early deterioration. |
| UV Exposure | Sunlight exposure dries out the foam, causing brittleness and cracks. |
| High-Volume Use | Loud or bass-heavy music can strain the foam and speed up wear. |
| Poor Manufacturing Quality | Cheap foam materials break down faster than higher-quality counterparts. |
Tools & Materials You’ll Need
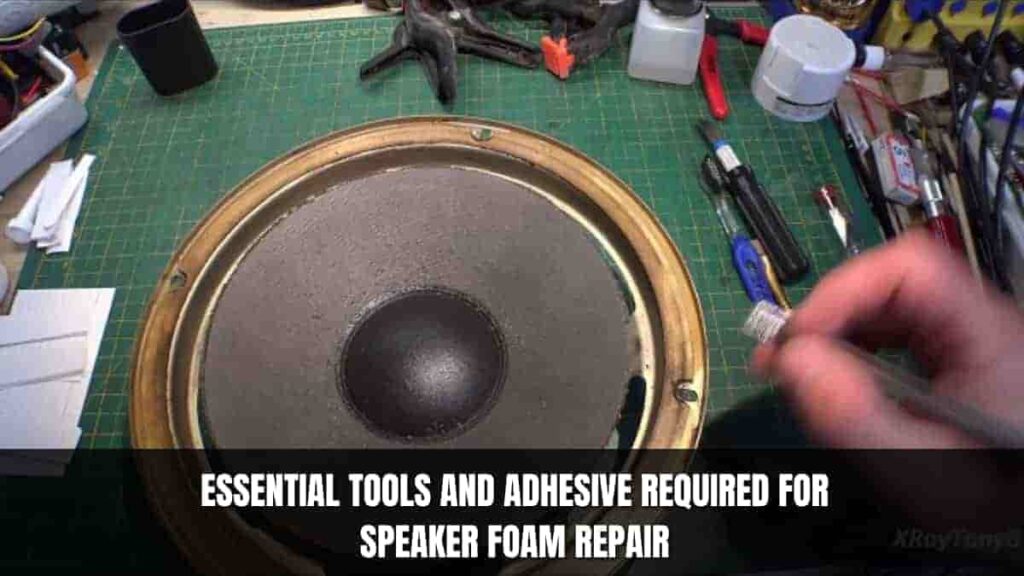
Before diving into the repair, make sure you have the following tools and materials:
Tools:
- Small flathead screwdriver or tweezers
- Utility knife or scalpel
- Paintbrush or foam applicator
- Rubbing alcohol or acetone
- Clean cloth
Materials:
- Foam surround repair kit (specific to your speaker size and model)
- Adhesive (usually comes with the kit or can be speaker glue/contact cement)
- Gasket (if damaged or included in the kit)
You can purchase foam surround kits online or at audio repair shops. Always match the diameter and brand/model of your speaker to ensure compatibility.
Step-by-step directions: Repair Speaker Foam Surround Damage
Step 1: Take the speaker out of its case.
Should your speaker belong to a speaker cabinet or box:
- Disassemble the front panel’s speaker.
- Pull it out gently without breaking any wires.
- If you want to reattach the wires later, note their polarity or cut their cables.
Tip: Photo of every stage. It will facilitate reassembly.
Step 2: Inspect the Damage
Carefully inspect the speaker:
- Check the foam surround for cracks, tears, or brittleness.
- Ensure the speaker cone is not damaged.
- Examine the dust cap and spider to confirm they’re intact.
If the cone is damaged, you may need professional repair or a full speaker replacement.
Step 3: Remove the Old Foam Surround
This is the most time-consuming part. Be patient and thorough.
- Use a small flathead screwdriver or utility knife to gently peel off the old foam.
- Remove foam remnants from both the speaker cone and metal basket.
- Be careful not to rip the speaker cone—apply minimal pressure.
- Clean the surfaces with rubbing alcohol and a cloth to remove adhesive residue.
Important: If your speaker has a gasket (rubber ring on top of the foam), remove and save it if it’s still usable.
Step 4: Align the New Foam Surround
Now that the speaker is clean, it’s time to install the new foam:
- Dry-fit the new foam to ensure it matches your speaker dimensions.
- Place the foam over the speaker cone and align it without applying glue yet.
- Make sure the inner and outer edges align with the original foam’s location.
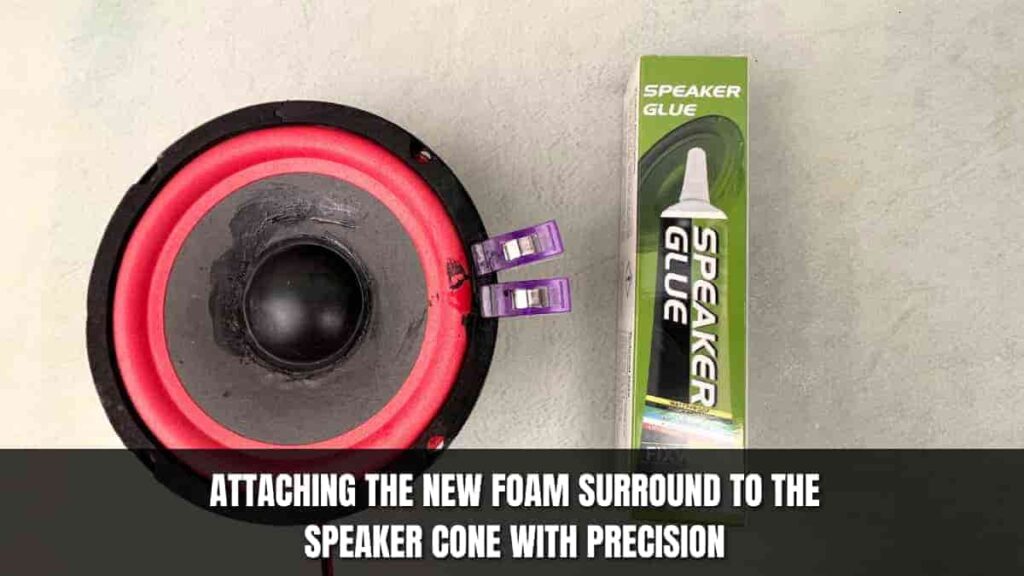
Step 5: Glue the Inner Edge to the Cone
Once you’re confident with the alignment:
- Apply a thin layer of adhesive to the inner edge of the foam surround.
- Press the foam lightly onto the speaker cone.
- Smooth out any wrinkles and ensure good contact.
- Let the glue dry according to the instructions (typically 1–2 hours).
Avoid using excessive glue—it can seep into the cone and affect performance.
Step 6: Glue the Outer Edge to the Speaker Frame
After the inner edge dries:
- Lift the outer edge and apply adhesive to the speaker frame.
- Press the foam’s outer ring onto the frame.
- Use a few clothespins or light weights to hold it in place while drying.
Ensure the cone can move freely and isn’t tilted or off-center.
Step 7: Center the Voice Coil (Optional But Recommended)
If your speaker’s voice coil rubs or produces a scraping sound, it may be misaligned. Centering it ensures the cone moves freely.
Foam Kits with Centering Shims:
- Some kits include shims that go around the voice coil to hold it in place.
- You’ll need to remove the dust cap (small dome in the center of the cone) carefully and insert the shims.
If your speaker works fine without noise, you can skip this step.
Step 8: Reattach the Gasket
If your speaker had a gasket (usually found on the outer edge of the foam):
- Apply a small amount of glue to the outer edge.
- Press the gasket onto the new foam.
- Allow it to dry fully before reassembly.
Step 9: Reinstall the Speaker
Once the glue has cured (usually 24 hours for best results):
- Reconnect the wires to the correct terminals.
- Reinsert the speaker into the enclosure.
- Secure it with screws.
Step 10: Test Your Speaker
Play some audio at a low volume:
- Listen for clean sound without distortion or buzzing.
- Slowly increase the volume to check the bass response.
- Gently press the speaker cone to ensure smooth movement without scraping.
If all sounds good, congratulations—you’ve successfully repaired your speaker foam surround!
When to Repair vs. Replace
Sometimes it’s better to replace the speaker instead of repairing it.
| Situation | Repair or Replace? |
| Minor foam damage, good cone | Repair |
| Severe cone or voice coil damage | Replace |
| Unavailable foam size/model | Replace |
| Sentimental or vintage speaker | Repair |
Pro Tips for Long-Lasting Speaker Foam
- Avoid sunlight: Keep your speakers away from windows or direct sunlight.
- Control humidity: Use dehumidifiers in moist environments.
- Use speaker grills: They protect foam from physical damage.
- Don’t max out volume often: High bass can strain the foam unnecessarily.
Also Read : Fix my Speaker
FAQs – Fixing Speaker Foam Surrounds
Q1 Can I apply any foam surround for my loudspeaker?
No. Your speaker’s diameter, profile, and compliance must correspond with foam surrounding. Using the wrong one can result in mechanical failure or sound distortion.
Q2. Which speaker foam glue should I use?
Most sets contain a particular speaker glue. Though PVA glue or contact cement would also work, steer clear of epoxy or superglue—they’re too stiff.
Q3. Should ancient speakers be repaired?
Repairing your rare, vintage, or high-quality speaker is usually sensible. Its lifetime is extended and it costs less than purchasing a new speaker.
Q4. How long does a foam surround mend survive?
Given correct installation and upkeep, a fresh foam surround could survive 10 to 15 years or even longer.
Final Thoughts: Restore Your Sound, Save Your Wallet
Though it may appear difficult, repairing damaged foam surrounds is an affordable and satisfying approach that may revitalize your speakers. Using the proper tools, some patience, and this guide by your side, you can finish a foam surround replacement in only a few hours.
Whether you are an audiophile, a do-it-yourself enthusiast, or merely someone trying to save money, fixing your speaker foam may restore the rich, deep sound you adore—without going bankrupt.
Questions or help needed? Contact us through our Contact Us page or write us a remark below. Happy fixing!